CNCF recommends four steps to achieve cloud native for your application:
Containerization of your application through Docker and push its image into registry
Setup CI/CD pipeline for DevOps automation
Using orchestrator such as Kubernetes to manage the full application life cycle
Add observability and analysis capacity to your deployed application
Add building block such as ingress, service mesh to enhance security, traffic control, tracing capacity to deployed application
Let’s start from scratch to achieve those goals using Microsoft Azure public cloud. At the end of this demo, you will have a deployed, containerized service running in a public cloud meeting above CNCF criteria.
Deploy a Kubernetes Cluster in Azure
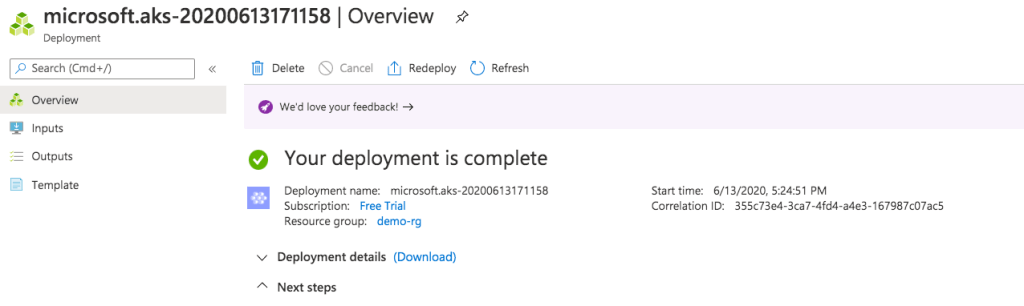
This can be done either using Azure CLI or its GUI interface following a couple of easy steps. Here is the deployed Kubernetes cluster inside my Azure account using GUI interface from the quick start session:
Follow those GUI easy steps, select your cluster name, create a resource group, networking method and so on, you will have your Kubernetes cluster ready to use.
After your Kubernetes orchestored cluster is ready, go to its CLI to use your familiar command like kubectl to exam your cluster:
Deploy a containerized Application
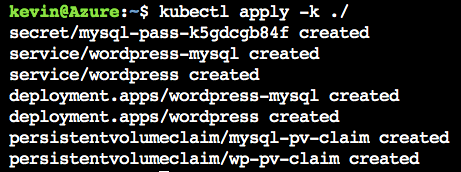
Now, let’s deploy a containerized wordpress application inside the Kubernetes cluster following this procedure: wordpress application and it works without any issue. Here, containerized wordpress application, associated database, persistent volume are realized through Azure CLI command using kubectl. The service type used during this deployment is load balancer and you will get an routable IP address to access your service after those procedures.
Verify your wordpress application is up and running using the global IP address assigned to WordPress service:
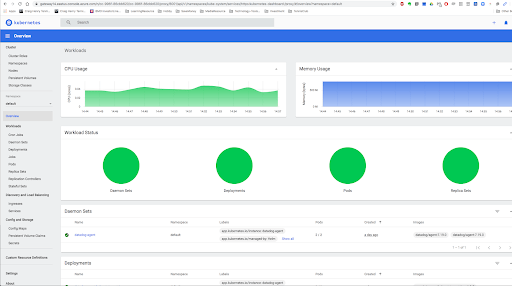
Install Kubernetes dashboard to your cluster to add basic monitoring capacity by following step:
Get the global web address and according sign in token; then go to this web page, select sign in with token:
From there, you can do normal cluster administrative tasks through this GUI interface.
Add Cluster Monitoring and Visibility Facilities
There are built-in monitoring features inside Azure infrastructure such as Logs, Metrics, Insights, which can be accessed from your Azure portal:
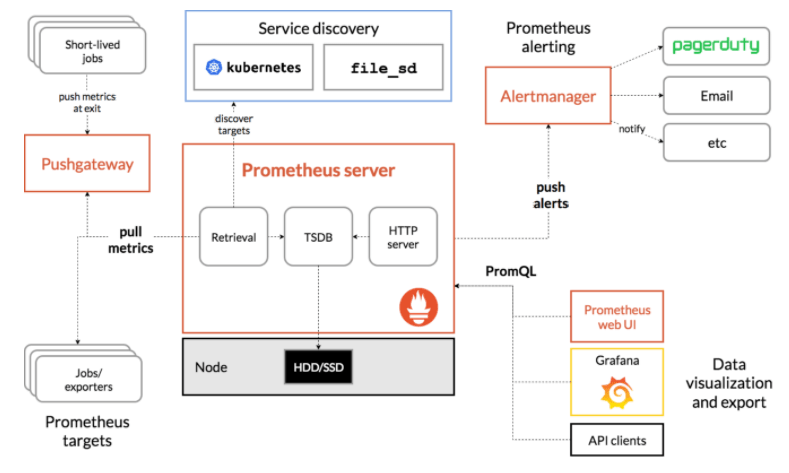
Besides that, I tried to install and use two other Kubernetes cluster monitoring solutions in the above cluster: the managed solution from datadog and the open sourced one: prometheus with grafana. Those all rely on Kubelet cAdvisor, metrics server and kube-state-metrics component to scrape raw data from node, kubernetes itself, its deployed pods and applications running over it.
Helm is used to installed datadog agent inside the cluster by those steps and the containerized Datadog agent is deployed as a Kubernetes daemonset:
Verify datadog agent is successfully installed on your cluster from Azure CLI:
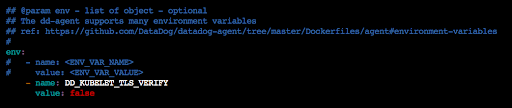
For quick testing purpose, disable TLS authentication with Kubernetes API server for Datadog by update Datadog helm chart’s values.yaml and update Datadog agent with helm upgrade command in order to make the Datadog agent to work:
Go to your datadog web portal, select your cluster, you should be able to see your cluster related metrics:
Let’s install the popular open source monitoring tool: Prometheus and its Grafana dashboard.
Prometheus and Grafana Helm charts can be used to finish those two installations pretty easy and straightforward. Within helm git repo downloaded before, those Helm charts have been downloaded already. Follow those simple steps, you can install both tools from Azure command line:
Make sure to expose prometheus as a load balancer type of service to let Azure assign it a routable IP address. Then, you can access prometheus build in dashboard through that IP address with port 9090:
Use similar step to install Grafana dashboard from its helm chart, expose its service as load balancer type and you can access Grafana dashboard from Aure assigned routable IP address:
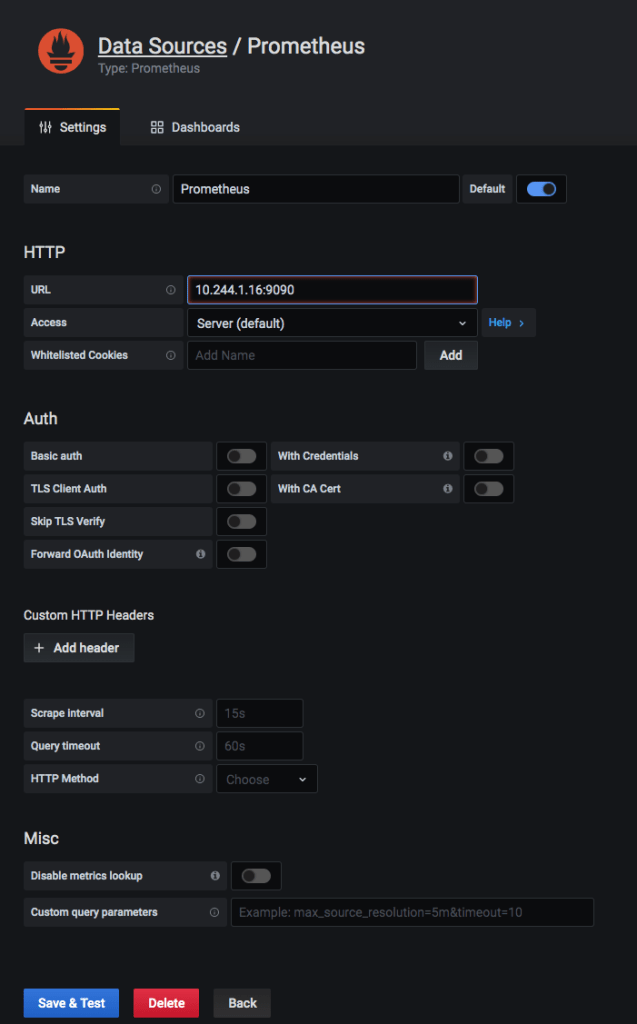
Add prometheus type data source to Grafana:
Go to Grafana web page to download a dashboard examples, for example, dashboard number 11802, import it into Grafana through GUI to start your cluster monitoring:
In order to let Prometheus to monitor your application besides the infrastructure components, you have to add prometheus data feeding capacity into your containerized application by using its SDK library, instrument your application with prometheus.io/scrape: ‘true’ and prometheus.io/port” ‘9090’ annotations. For example, by following yaml descriptive file, you can deploy a service with its according deployment with above annotations to monitor the performance specific to your deployed application.
Add Service Mesh and Ingress to your Cluster
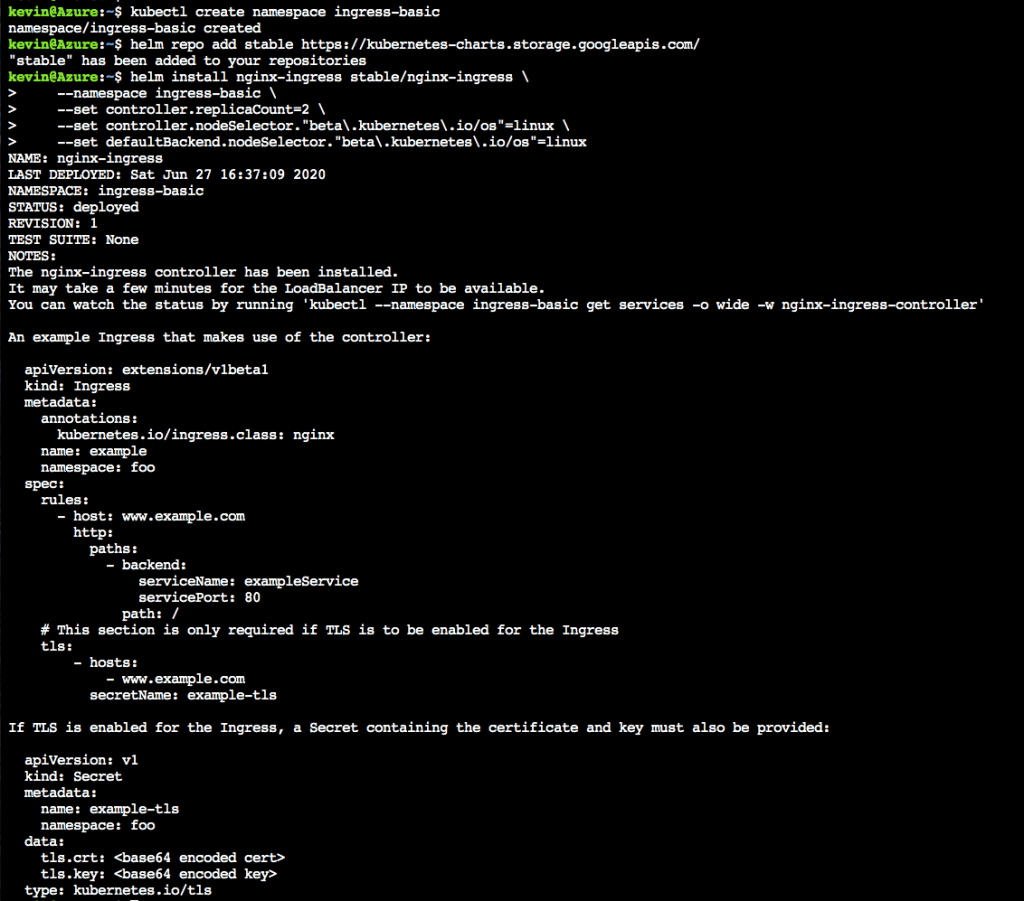
Service mesh solutions, like Istio, can be used to provide an infrastructure layer for the deployed micro service applications, decouple the application function with underlying infrastructure functions, discover, monitor and track deployed application, secure and rate limiting communications between services, through non instrumented sidecar mechanisms. Its installation on Azure is well documented by Azure AKS user guide. Same as installing an Ingress controller for your cluster, which can provide layer 7 application traffic routing and reverse proxy functions. I finished all those components’ installation without issues by following those installation guides: Istio service mesh inside Azure and Ingress Controller inside Azure. After the installation, you can play with some of the reverse proxy application routing examples. Here are some steps I captured during this process:
Use CI/CD Pipeline
Azure has built-in CI/CD solution by setting up a DevOps project following “Create a CI/CD Pipeline with Azure DevOps Projects” from its quick start session if you develop your application using .NET, Java, Python, PHP, Node.js. It has the basic features such as auto release building upon new code check in, auto testing and deliver. But, for more advanced features, you have to use open source tools like Jenkins/Jenkins x/Spinnaker and even bring in service mesh solutions for advanced canary release, rolling update of your microservice applications.
Summary
Through the above procedures, a full cycle of CNCF recommended work flow is achieved using Microsoft Azure public cloud.
Multiple cloud Virtual Infrastructure Manager (VIM) exists for cloud infrastructure, such as OpenStack, Kubernetes, Kubeless, CloudStack to name a few. How to combine and utilize the best pieces from different solutions for the sake of faster cloud deployment, easy to manage, update and upgrade ? What’s the role of service mesh, API gateway will play for the overall cloud native application deployment architecture ? What are serverless functions ? How to achieve end to end visibility for your deployed cloud ?
For sure, no single solution can achieve all those goals. Stay tuned for this video I posted in Linkedin originally to understand technologies, solutions addressing those challenges.
How much time have you spent in your career chasing unclosed sockets, unreleased hardware mutexes, or memory leaks?
If you write C for embedded systems, you already know this kind of headache. Handling errors means meticulously cleaning up resources before every single return statement. If you miss just one, your system crashes in production three months later.
Over my 30 years building low-level systems and network architectures at companies like Nortel, Meta, and Intel, I’ve seen this exact bug cost thousands of engineering hours. Today, we are going to fix it permanently by moving from C to modern C++, using a concept called RAII.
RAII stands for Resource Acquisition Is Initialization. It’s a terrible acronym for an incredibly beautiful concept. Let me show you what it replaces.
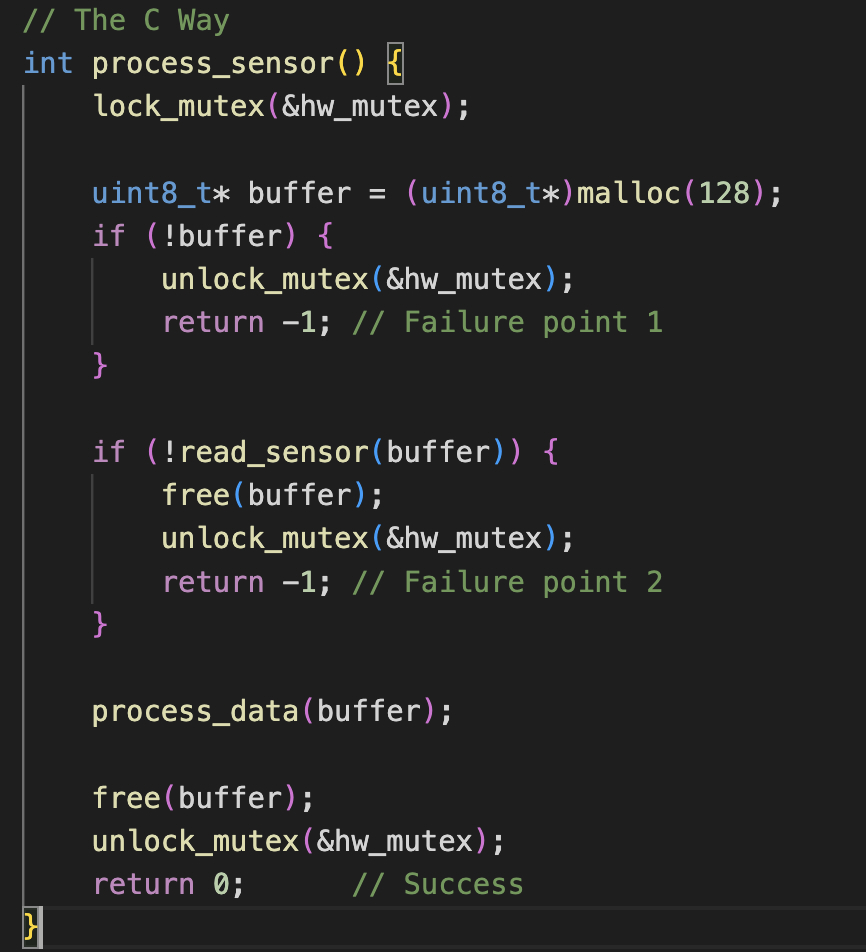
Take a look at this standard C function. We need to lock a hardware mutex, allocate a temporary buffer, read a sensor, and then unlock the mutex before returning.
Screenshot
Look at the repetition. Because we have multiple points of failure, we have to manually release the memory and the mutex every single time we exit the function. Some developers try to clean this up using a goto error_cleanup block, but that just creates spaghetti code.
Managing resources in C is like checking out books from a library, and having to manually drive each one back before closing time. If you get distracted and forget, you get a penalty.
RAII is like having a digital library book. The exact millisecond your reading time is up, the book deletes itself from your device. Zero manual overhead. Let’s see how that looks in C++.
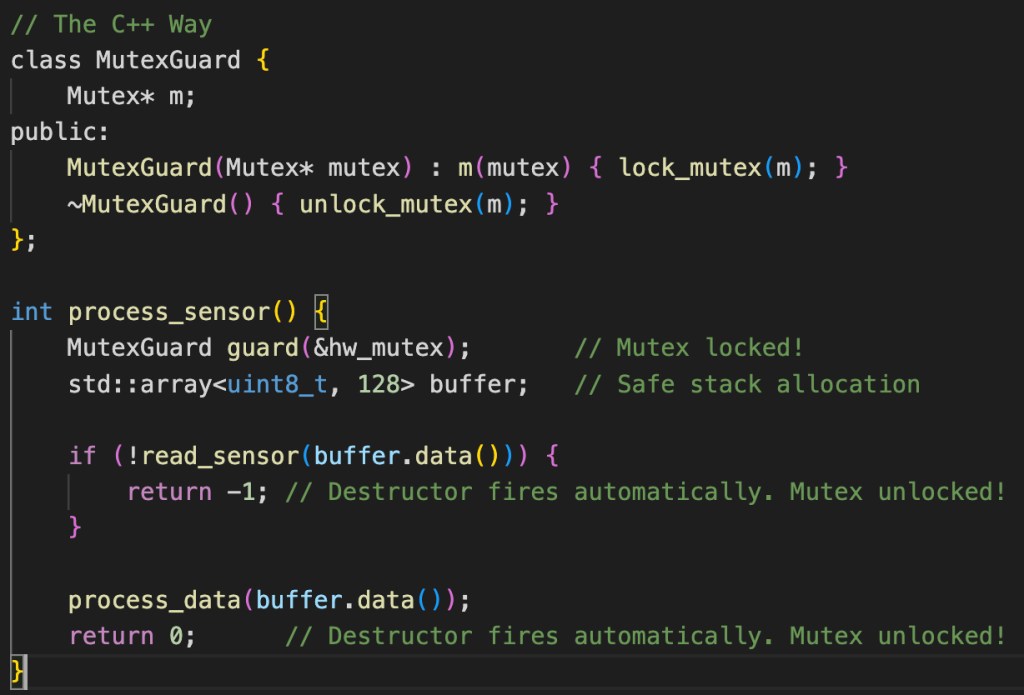
In C++, we tie the lifecycle of a resource—like our hardware mutex—to the lifecycle of a local object on the stack. When the object is created, its constructor locks the mutex. When the object goes out of scope, its destructor automatically unlocks it.
Now, watch what happens to our business logic when we use this guard, and replace that risky C malloc with a modern C++ std::array that lives safely on the stack.
Screenshot
Look at how clean that is. No matter how we exit this function—whether it’s an error or a success—the C++ compiler guarantees that the MutexGuard destructor is called and the mutex is unlocked. The memory leak is physically impossible to write.
Now, I know what the embedded C veterans are thinking right now. “This looks nice, but what is the runtime cost, code size increase of these classes and destructors? I don’t have cycles to use on a microcontroller.”
Here is the best part: it is a zero-cost abstraction.
Because we define the MutexGuard inline, a modern compiler optimizes it perfectly. If you look at the generated assembly code, the C++ version produces the exact same, highly optimized machine instructions as the manual C version. You get absolute safety at compile time, with zero overhead at runtime.
Shifting your mindset from manual resource management to RAII is the single biggest upgrade you can make for your codebase’s reliability.
If you want to see exactly how to write your own zero-overhead RAII wrappers for hardware peripherals, timers, and DMA buffers, I’ve written a book, Modern C++ for Embedded C Engineers, where I go deeper into many of the ideas and techniques we’ve discussed in this series. It’s designed specifically for engineers who want the strict, resource-constrained subset of C++, not the desktop like C++, that belongs on modern embedded devices. You can find more information about the book in the home page.
The rules of software engineering have fundamentally changed. With AI generating code faster than ever, students and junior engineers are facing an unprecedented level of anxiety. I hear the same questions constantly: Is a computer science degree still worth it? Where are the good tech jobs hiding? How do I avoid being replaced by an algorithm in my very first role?
Over the last 30 years, I have worked as a software engineer and architect across the tech industry—building everything from low-level embedded systems to cloud edge architectures. I have seen technology frameworks and languages come and go, but the AI era is entirely different.
The coming decades will not be defined by who can write the most code. They will be defined by who can design the most resilient systems.
That is exactly why I wrote my new book: The Durable Software Engineer: Building Reusable Skillsets for the AI-Cloud-Edge Trinity. I wanted to take three decades of frontline industry experience and distill it into a concrete, step-by-step masterplan for the next generation of engineers.
Bridging the Gap Between Theory and Reality
I wrote this book because I saw a massive, dangerous gap between what schools teach and what top companies actually need today. The Durable Software Engineer is designed to solve specific pain points across three critical stages of your career journey:
1. The High School Crossroads: Choosing the Right Path
Right now, students and parents are worried about investing in a degree that AI might make obsolete. In the book, I show you how to perform a deep self-evaluation to choose the exact right major for your personality—whether that is Computer Science, Computer Engineering, or Electrical Engineering. I break down exactly why a software career is still one of the most promising futures you can choose, and what foundational skills you need to build now to lead the AI revolution, rather than fear it.
2. The University Gap: Landing Your First Co-op
So many students drown in heavy academic theory but graduate completely disconnected from real-world execution. You get a piece of paper, but you don’t know how to build a system. I detail exactly which core courses actually matter long-term, and give you a clear blueprint for the side projects you need to build. You will learn how to translate classroom theory into high-value portfolio projects—focusing on irreplaceable skills like Object-Oriented Design, system safety, and high-value languages like Modern C++ and Python—to secure your first internship or co-op.
3. The Early Career Trap: Supervising AI
Junior engineers today are exhausted by constantly chasing trendy tools and terrified that AI will eliminate entry-level coding roles. In this book, I teach you how to shift your mindset. You will learn how to stop being a disposable “code-typist” and become an “architectural orchestrator.” I detail how to work with AI to multiply your daily output, and how to develop the cross-domain communication, leadership, and architectural judgment to know what should be built, not just how to build it.
Start Building a 30-Year Career Today
Your first job is only the beginning. The real challenge is building a resilient, adaptable, and deeply rewarding career in an industry that never stops changing.
If you are ready to equip yourself with the engineering skills that never expire, the book is officially available now.
Thank you to everyone who has supported this launch. If you know a high schooler choosing a major, a university student hunting for a co-op, or a junior engineer trying to find their footing, please share this post with them.
Here is to building skillsets that last a lifetime.
Do you realize that 70% of legacy C embedded codebases have critical security vulnerabilities: memory leak, safety failures, difficult to expand. By industry statistics, over 60% of engineering bandwidth is consumed by the maintenance of those non-reusable legacy systems. If you feel the same pain in your project, this book is for you. It lets you master the zero-cost abstraction provided by modern C++ Object-Oriented Design (OOD), avoid some heavy desktop C++ features, keep your binary as small, efficient and perform as your C code. Hybrid mode let you gain the benefit of C++ and keep the value of your old C codebase investment. Stop writing generic code. Start engineering for performance. This is the definitive bridge from legacy C to high-performance Modern C++, tailored for the engineers defining the future of real-time software for AI-integrated IoT, autonomous vehicles, cloud computing edge device and AR/VR.
This is why I published a new book with the title: Modern C++ for Embedded C Engineers: The Strategic Bridge to the Future.
Why This Book?
While Python dominates the AI “frontend,” the engines—TensorFlow, PyTorch, and llama.cpp—are built on C++. As hardware becomes more software-defined, the gap between legacy C and Modern C++ is closing. Mastery of these skills creates a professional “moat” around your career. In an era of AI automation, the ability to optimize under extreme hardware constraints is the ultimate job security.
It answers following crucial question inside experienced, C embedded engineers’ mind: How toDefuse the Risk Without the Bloat ?
Many engineers avoid C++ due to fears of code-size bloat and execution penalties. This book provides the architectural proof that you can achieve Zero-Cost Safety. Written by a 30-year veteran software engineer and architect (Meta, Intel, Nortel Networks, BlackBerry, ABB), this guide demonstrates how to leverage Modern C++ as a high-performance abstraction layer that integrates seamlessly with your existing C codebases, while strictly avoiding heavy desktop C++ features.
Inside this book, you will master:
High-Performance Infrastructure: Deep dives into RDMA, Smart NIC, and DPDK for cloud networking.
RAII & Resource Management: Eliminate memory leaks by design without runtime overhead.
The Zero-Cost Philosophy: Use abstractions as fast as hand-written C but far safer.
Abstraction without Bloat: Move runtime execution to compile-time using templates and constexpr.
Compile-Time Power: Shrink binaries using LTO and LTCG.
Deterministic Safety: Outperform traditional C designs using std::span and move semantics.
Hybrid Mode: Protect your investment by combining Modern C++ with legacy C APIs.
2. Beyond the Syntax – Built for Real-Time: It is Not Just Another C++ Book. It is A Precision Tool for High-Stakes Engineering.
At first glance, you might think, “The market is already flooded with C++ guides. Why this one?” The answer lies in the constraints. If you are developing for Autonomous Driving, AR/VR, or Mission-Critical Embedded Systems, you know that standard C++ programming is often too “heavy” or “unpredictable” for your needs. This book is different. It is not a generic language manual; it is a tactical manual for environments where memory is a luxury and latency is an enemy.
3. What sets this book apart:
The “Real-Time” Filter: We don’t just teach Modern C++; we curate it. Discover which high-level features empower your system and which hidden overheads will break it.
Constraint-First Methodology: Specifically designed for scenarios with limited RAM and extreme computational demands. We summarize the “Must-Haves” and, more importantly, the “Must-Avoids.”
Mastering the Hybrid Paradigm: Learn the art of “Mixed-Mode” development—integrating C and C++ seamlessly to maintain low-level control while leveraging modern abstraction.
The book’ ebook and paperback version can be ordered at:
Stop writing generic code. Start engineering for performance. This is the definitive bridge from legacy C to high-performance Modern C++, tailored for the engineers defining the future of real-time software for AI-integrated IoT, autonomous vehicles, cloud computing edge device and AR/VR.
In embedded systems design, C++’s object-oriented features are typically introduced only after the platform hardware and RTOS have been fully initialized. In this article, I will demonstrate the significant benefits of using C++—instead of plain C—for low-level embedded tasks such as hardware register access.
Access Hardware Register in C Style
Following is how to update an hardware register, such as writing an fixed value to it, in C code:
This works fine by using an raw macros. But, if you want the code safer and type-checked, you should use what modern C++ code provided mechanism, such as constexpr inline function.
Access Hardware Register in C++ Style
Instead of using raw #define, the memory-mapped register access can be wrapped in a constexpr inline function or even a small class template.
#include <cstdint>

constexpr std::uintptr_t REG_BASE = 0x1000;

inline volatile std::uint32_t& REG_ADDR()
{
    return *reinterpret_cast<volatile std::uint32_t*>(REG_BASE);
}

int main() {
    REG_ADDR() = 0x1;        // Assign 1 to address 0x1000
    std::uint32_t val = REG_ADDR();  // Read from address 0x1000
}
Here, reinterpret_cast ensures type-safe conversion from integer to pointer. Returning a reference volatile std::uint32_t& makes the usage look like a normal variable and the compiler still enforces correct type.
The above code works great for 32 bits register. C++ can use template to extend your code to provide safer register access for any register width.
#include <cstdint>

template<std::uintptr_t address, typename T = std::uint32_t>
struct reg {
    static volatile T& value() {
        return *reinterpret_cast<volatile T*>(address);
    }
};

int main() {
    // Write to register at 0x1000
    reg<0x1000>::value() = 0x1;

    // Read back
    std::uint32_t val = reg<0x1000>::value();
}
The code is safer and extendible. For example, if you initialize an reg<0x1000, std::uint8_t>, but assign a uint32_t value to it, the compiler will warn this kind of mismatch. Also, in real driver code, you usually need manually provide the bit or bits set, clear, read, shift macro in C code. C++ can wrap all those into class to avoid the possible errors of those manual macro operation:
#include <cstdint>
#include <cstddef>

template<std::uintptr_t address, typename T = std::uint32_t>
class reg {
public:
    using value_type = T;

    // Read the whole register
    static value_type read() {
        return *ptr();
    }

    // Write the whole register
    static void write(value_type val) {
        *ptr() = val;
    }

    // Set specific bit(s)
    static void set_bit(std::size_t bit) {
        *ptr() |= (value_type(1) << bit);
    }

    // Clear specific bit(s)
    static void clear_bit(std::size_t bit) {
        *ptr() &= ~(value_type(1) << bit);
    }

    // Toggle specific bit(s)
    static void toggle_bit(std::size_t bit) {
        *ptr() ^= (value_type(1) << bit);
    }

    // Read a specific bit
    static bool read_bit(std::size_t bit) {
        return (*ptr() >> bit) & value_type(1);
    }

private:
    static volatile value_type* ptr() {
        return reinterpret_cast<volatile value_type*>(address);
    }
};

// Define a 32-bit hardware register at address 0x1000
using MyReg = reg<0x1000, std::uint32_t>;

int main() {
    // Write entire register
    MyReg::write(0x1234);

    // Read entire register
    std::uint32_t val = MyReg::read();

    // Set bit 3
    MyReg::set_bit(3);

    // Clear bit 1
    MyReg::clear_bit(1);

    // Toggle bit 7
    MyReg::toggle_bit(7);

    // Read bit 0
    bool b = MyReg::read_bit(0);
}
C++ code encapsulated all your needed register access APIs in a clean class. The volatile declaration in the class ensures the compiler does not optimize away reads and writes operations. Template enforces type safety (uint8_t, uint16_t, uint32_t). The result is a clear, reusable interface for hardware peripheral registers manipulation.
Next, we want to extend above class to be able to manipulate multiple bit fields of a register instead of just one bit, which is a common requirement to manipulate a register with fields like BAUD, ENABLE, MODE of UART control register:
#include <cstdint>
#include <cstddef>
#include <type_traits>

template<std::uintptr_t address, typename T = std::uint32_t>
class reg {
public:
    using value_type = T;

    // ---- Whole register operations ----
    static value_type read() {
        return *ptr();
    }

    static void write(value_type val) {
        *ptr() = val;
    }

    static void set_bit(std::size_t bit) {
        *ptr() |= (value_type(1) << bit);
    }

    static void clear_bit(std::size_t bit) {
        *ptr() &= ~(value_type(1) << bit);
    }

    static void toggle_bit(std::size_t bit) {
        *ptr() ^= (value_type(1) << bit);
    }

    static bool read_bit(std::size_t bit) {
        return (*ptr() >> bit) & value_type(1);
    }

    // ---- Nested class for bitfields ----
    template<std::size_t pos, std::size_t width>
    class field {
        static_assert(width > 0, "Bitfield width must be > 0");
        static_assert(pos + width <= sizeof(value_type) * 8,
                      "Bitfield exceeds register size");

    public:
        using field_type = typename std::conditional<
            (width == sizeof(value_type) * 8),
            value_type,
            typename std::conditional<(width <= 8), std::uint8_t,
            typename std::conditional<(width <= 16), std::uint16_t,
            std::uint32_t>::type>::type>::type;

        // Generate mask for this field
        static constexpr value_type mask =
            ((value_type(1) << width) - 1) << pos;

        // Read the field value
        static field_type read() {
            return (reg::read() & mask) >> pos;
        }

        // Write a new value to the field
        static void write(field_type val) {
            value_type tmp = reg::read();
            tmp &= ~mask;                      // clear field
            tmp |= (value_type(val) << pos) & mask;
            reg::write(tmp);
        }
    };

private:
    static volatile value_type* ptr() {
        return reinterpret_cast<volatile value_type*>(address);
    }
};

// Example to manipulate and UART control register:
//UART control register at 0x2000 with the following layout:

// ENABLE → bit 0

// MODE → bits 1–2 (2 bits wide)

// BAUD → bits 4–7 (4 bits wide)
using UART_CTRL = reg<0x2000, std::uint32_t>;

// Define bitfields
using ENABLE = UART_CTRL::field<0,1>;   // 1 bit
using MODE   = UART_CTRL::field<1,2>;   // 2 bits
using BAUD   = UART_CTRL::field<4,4>;   // 4 bits

int main() {
    // Enable UART
    ENABLE::write(1);

    // Set MODE = 2
    MODE::write(2);

    // Set BAUD = 9
    BAUD::write(9);

    // Read back values
    bool enabled = ENABLE::read();
    auto mode    = MODE::read();
    auto baud    = BAUD::read();
}
The above code is Type-safe: You can’t accidentally write a huge number into a small field; Self-documenting: The code clearly expresses intent (BAUD::write(9) instead of bit shifts); No runtime overhead: Everything compiles down to simple read-modify-write bit operations.
Further more, we can add enum support for fields like MODE (so you can write MODE::write(MODE::ASYNC) instead of raw numbers:
#include <cstdint>
#include <cstddef>
#include <type_traits>

template<std::uintptr_t address, typename T = std::uint32_t>
class reg {
public:
    using value_type = T;

    // ---- Whole register operations ----
    static value_type read() {
        return *ptr();
    }

    static void write(value_type val) {
        *ptr() = val;
    }

    static void set_bit(std::size_t bit) {
        *ptr() |= (value_type(1) << bit);
    }

    static void clear_bit(std::size_t bit) {
        *ptr() &= ~(value_type(1) << bit);
    }

    static bool read_bit(std::size_t bit) {
        return (*ptr() >> bit) & value_type(1);
    }

    // ---- Nested class for bitfields ----
    template<std::size_t pos, std::size_t width, typename Enum = void>
    class field {
        static_assert(width > 0, "Bitfield width must be > 0");
        static_assert(pos + width <= sizeof(value_type) * 8,
                      "Bitfield exceeds register size");

    public:
        using raw_type = typename std::conditional<
            (width == sizeof(value_type) * 8),
            value_type,
            typename std::conditional<(width <= 8), std::uint8_t,
            typename std::conditional<(width <= 16), std::uint16_t,
            std::uint32_t>::type>::type>::type;

        static constexpr value_type mask =
            ((value_type(1) << width) - 1) << pos;

        // Read as raw integer
        static raw_type read() {
            return (reg::read() & mask) >> pos;
        }

        // Read as enum if provided
        static Enum read_enum() {
            static_assert(!std::is_same<Enum, void>::value,
                          "Enum type not specified for this field");
            return static_cast<Enum>(read());
        }

        // Write raw integer
        static void write(raw_type val) {
            value_type tmp = reg::read();
            tmp &= ~mask;
            tmp |= (value_type(val) << pos) & mask;
            reg::write(tmp);
        }

        // Write enum value
        static void write(Enum val) {
            write(static_cast<raw_type>(val));
        }
    };

private:
    static volatile value_type* ptr() {
        return reinterpret_cast<volatile value_type*>(address);
    }
};

using UART_CTRL = reg<0x2000, std::uint32_t>;

// Define enums for MODE
enum class Mode : std::uint8_t {
    Idle   = 0,
    Async  = 1,
    Sync   = 2,
    IrDA   = 3
};

// Define bitfields
using ENABLE = UART_CTRL::field<0,1>;                  // no enum
using MODE   = UART_CTRL::field<1,2, Mode>;            // with enum
using BAUD   = UART_CTRL::field<4,4>;                  // no enum

int main() {
    // Enable UART
    ENABLE::write(1);

    // Set MODE using enum
    MODE::write(Mode::Async);

    // Set BAUD to 9
    BAUD::write(9);

    // Read back
    bool enabled = ENABLE::read();
    Mode mode    = MODE::read_enum();
    auto baud    = BAUD::read();
}
Everything looks great so far. But, you may have noticed that there is no address size checking in all those above implementation. Address type :std::uintptr_t already adapts to platform pointer width automatically. It is the C++ standard unsigned integer type guaranteed to be able to hold a pointer. Its width depends on the platform: On a 64-bit CPU (x86-64, Arch64), it is uint64_t. On an 8-bit MCU , it is uint16_t (if address space is 64 KB) and on a 32-bit MCU (ARM Cortex-M, AVR32, etc.) , it is an uint32_t.
Want to explicit control the address size ? No problem. Just add another template parameter to the class as following:
template<typename AddrType = std::uintptr_t, AddrType address = 0, typename T = std::uint32_t>
class reg {
public:
    using value_type = T;
    using addr_type  = AddrType;

private:
    static volatile value_type* ptr() {
        return reinterpret_cast<volatile value_type*>(address);
    }

public:
    static volatile value_type& value() {
        return *ptr();
    }
};

// Example usage
// 8-bit address space (rare, but imagine tiny MCU with <256 bytes mapped regs)
using REG8ADDR = reg<std::uint8_t, 0x10, std::uint8_t>;

// 16-bit address space
using REG16ADDR = reg<std::uint16_t, 0x1000, std::uint8_t>;

// Normal (auto-detects platform, usually 32-bit or 64-bit)
using REGDEFAULT = reg<>;
We’ve seen how C++ can offer real benefits even in low-level embedded projects. If those gains matter more to you than a small increase in code size, then C++ is probably the smarter choice over plain C.
As embedded systems continue to power everything from consumer electronics and automotive controllers to medical devices and industrial IoT nodes, the demand for high performance and design flexibility has never been greater. Today’s embedded platforms must juggle real-time responsiveness, power efficiency, connectivity, security, and rapid development cycles — all within tight resource constraints. Choosing the right combination of software — including real-time operating systems (RTOS), Linux-based distributions, middleware, drivers, and development tools — is crucial to building scalable and future-proof solutions. In this article, we explore the most effective software combinations for modern embedded systems, helping engineers strike the ideal balance between performance, flexibility, and maintainability.
Best Software Combinations for Performance and Flexibility
In today’s embedded landscape, systems are powering increasingly complex devices: from industrial automation and connected vehicles to smart medical devices and AR/VR-enabled wearables. As the demands on these platforms grow, so too does the importance of selecting the right software combination to balance real-time constraints, performance needs, and long-term maintainability. This article focuses on one crucial decision: choosing the appropriate programming language(s) and architecture for the embedded software. Specifically, we compare Assembly, C, and C++ with object-oriented design (OOD), examining their roles, trade-offs, and relevance in modern, performance-driven, and AI/AR-compatible systems.
Language Profiles Overview
Assembly Language
Low-level, hardware-specific language offering direct access to registers and memory.
Ideal for fine-tuned performance but extremely difficult to maintain or scale.
C Language
Procedural programming language with close-to-the-metal efficiency.
The de facto standard in embedded development due to its balance of control, portability, and speed.
C++ with Object-Oriented Design (OOD)
High-level language enabling abstraction, encapsulation, and code reuse.
Increasingly popular in complex embedded applications involving AI, ML, and multimedia.
Pros and Cons
Feature
Assembly
C
C++ (OOD)
Performance
✅ Highest
✅ Very High
⚠️ Slight Overhead
Memory Efficiency
✅ Minimal
✅ Low
⚠️ Higher Usage
Portability
❌ Architecture-Specific
✅ Moderate
✅ High (with care)
Maintainability
❌ Low
⚠️ Medium
✅ High (if well-structured)
Development Speed
❌ Slow
✅ Fast
✅ Fast with Abstractions
Toolchain Support
⚠️ Limited
✅ Extensive
✅ Extensive
AI/AR Readiness
❌ Not Suitable
⚠️ Possible w/ libs
✅ Excellent Support
RTOS Compatibility
✅ Native support
✅ Native support
✅ Compatible with setup
Use Case Scenarios
Use Assembly When:
Writing bootloaders or startup code.
Implementing ultra-fast interrupt service routines.
Building scalable applications with reusable components.
Working on edge AI models, vision systems, or AR/VR frameworks.
Leveraging middleware, protocol stacks, or real-time communication.
Blended Approach
Most modern embedded systems benefit from a hybrid approach:
Assembly is used sparingly for optimization hotspots.
C forms the foundation for RTOS integration, hardware drivers, and low-level logic.
C++ takes over in application logic, user interaction, AI inference, and modular architecture.
This layered strategy ensures performance where it matters, without sacrificing maintainability and scalability.
Recommended Approach
The best approach is to use the blended approach indicated above. Assembly languages has to be used during early rebooting and hardware setup phase. C can be used after the memory block is initialized and stack frame is setup. After that, you are free to chose between C and C++ language. In an practical way, it is very difficult to do everything in C++ for modern embedded system due to many 3rd party solutions are written in C only, e.g. Zephyr RTOS, although C++ is supported by it.
In other point of view, some embedded systems are totally designed using C language, which is fine but missed a lot of ways to take advantage of modern C++ ( C++14 afterward especially) can provide. C++’s OOD design methodology along with idioms such as RALL, Rule of five, STL library and new language features make your design extensible, manageable and less error-prone. Take the need to make sure data structure are aligned correctly to avoid exception as an example which is demoed by following code snippet. It is not easy to get such kind of easy understandable, portable code with C language.
Other language features, such as template, smart pointer make your code more dense, less possible of memory leaking, expandable to different data type with less errors.
A common algorithm rarely needs to be reinvented and programed from scratch because the algorithm is probably available in the STL. In addition, the STL authors have diligently optimized it and tested it. Using the STL throughout the project, therefore, results in a more legible, efficient and portable body of source code, automatically. In addition, other developers will find it easy to analyze and review source code that uses the STL because the standardized template interface encourages consistent style and reinforces coding clarity.
Lambda expressions offer the compiler more opportunities to optimize by making the function, its iterator range and its parameters visible to the compiler within a single block of code. In this way, the compiler has access to richer set of register combinations, merge possibilities, etc. and it can do a better optimization. Using lambda expressions consistently throughout an entire project can save significant code and generally improve the performance of the whole software. Templates expose all of their code, their template parameters, function calls, program loops, etc. to compiler optimization at compile time. This provides the compiler with a wealth of information allowing for many intricate optimizations such as constant folding and loop unrolling. Using templates can result in many (sometimes subtle) improvements in runtime performance. Templates provide for scalability, allowing the scale and complexity of a particular calculation to be adjusted by changing the template parameters. compile-time constants are just as efficient as preprocessor #defines in C language, but have superior type information. Compile-time constants are well-suited for defining register addresses because they require no storage and are available for constant folding. Register addresses defined as compile-time constants can also be used as parameters in C++ templates.
This layered strategy ensures performance where it matters, without sacrificing maintainability and scalability.
Hardware Acceleration & Language Implications
Besides software and language considerations, modern embedded system combined both hardware features and software solutions tightly to achieve the overall goals.
Modern SoCs often include:
DSPs, NPUs, and TPUs for AI/ML acceleration.
ISPs and GPUs for image processing and AR/VR.
C++ is better equipped to interface with these accelerators via SDKs (e.g., TensorRT, OpenCV, OpenXR) and hardware abstraction layers. Toolchains now support C++17/20 features optimized for embedded environments (e.g., static polymorphism, constexpr, embedded STL).
RTOS Compatibility
RTOS selection is equal important for high performance embedded system design. Here is a list of commonly available RTOS solutions for language supporting point of views:
RTOS
Assembly
C
C++ (OOD)
FreeRTOS
✅
✅
✅ (w/ care)
Zephyr
✅
✅
✅ (CMake based)
ThreadX
✅
✅
⚠️ Partial support
VxWorks
✅
✅
✅ Full
RTEMS
✅
✅
✅ Full
Final Thoughts
No single language or architecture fits every embedded system. The best results often come from mixing Assembly, C, and C++ — each used where it makes the most sense. For maximum performance, minimal footprint, and long-term flexibility:
Use Assembly for critical optimizations.
Use C for low-level, RTOS-integrated logic.
Use C++ (OOD) for high-level architecture, especially when dealing with AI, AR/VR, or modular expansion.
By combining these layers with modern RTOS support and hardware acceleration, developers can create robust, future-ready embedded platforms that meet today’s demands without sacrificing tomorrow’s adaptability. Let’s dive into an special embedded application use case to evaluate which RTOS is best suitable for it, i.e. AI application oriented embedded system as the last illustration of what we have discussed so far.
Choosing the Right RTOS for AI-Oriented Embedded Applications
Why AI Needs a Carefully Selected RTOS
AI applications—such as edge vision inference, voice recognition, predictive maintenance, FSD driving, or AR/VR tracking—introduce unique demands on embedded systems:
Heavy use of parallel compute (DSP/NPU/TPU) and memory bandwidth.
Low-latency and deterministic response.
Multi-threaded data pipelines (camera, inference, UI, networking).
Real-time constraints with limited power and memory.
Hardware acceleration SDK integration (e.g., CMSIS-NN, TensorFlow Lite Micro).
Key Features required in an RTOS for AI Applications
Multithreading & SMP support for parallel inference tasks.
Low-latency deterministic scheduling to meet real-time needs.
Hardware SDK compatibility for NPUs, DSPs, and GPUs.
POSIX and C++ support for easy framework integration.
Fast boot & small footprint for edge devices.
Secure I/O and model handling via trusted memory regions.
Top RTOS Candidates for AI-Centric Applications
RTOS
AI Readiness
Key Strengths
Use Cases
Zephyr
⭐⭐⭐⭐
POSIX, TensorFlow Lite Micro, modular
Smart sensors, wearables, vision nodes
FreeRTOS
⭐⭐⭐
Lightweight, cloud ready
IoT edge AI, voice commands
RTEMS
⭐⭐⭐
Real-time + POSIX + SMP
Robotics, avionics, imaging
VxWorks
⭐⭐⭐⭐
Full POSIX, multicore, secure
Automotive, safety-critical AI
QNX
⭐⭐⭐⭐⭐
Certified RTOS with multimedia support
AR/VR, automotive, vision systems
ThreadX/Azure RTOS
⭐⭐
Tiny, cloud stack ready
Gesture or keyword detection
Example: RTOS Selection for Real-World AI Use Case
Use Case: Real-time smart camera with CNN inference.
Best Match: Zephyr or QNX for full AI/vision support, security, and modularity.
Reasons Considered to Choose RTOS
MCU vs MPU? : FreeRTOS/Zephyr vs. VxWorks/QNX.
Need for real-time AI response?: Choose preemptive RTOS with low-latency scheduling.
Hardware accelerator SDK available?: Match RTOS to vendor tools.
Cloud-connected or OTA model updates?: Look for modular networking and TLS (e.g., Zephyr, Azure RTOS).
Safety or certification required? : Use QNX, SafeRTOS, or VxWorks.
With those careful selection, embedded developers can unlock high performance AI at the edge while maintaining real-time predictability and system safety
Sample Architecture Diagram for AI-Centric RTOS-based System
#include "tensorflow/lite/micro/micro_interpreter.h"
#include "FreeRTOS.h"
#include "task.h"

void ai_task(void* pvParameters) {
    // Load model and allocate tensors
    tflite::MicroInterpreter* interpreter = LoadMyModel();

    while (true) {
        CaptureImage();                // From camera sensor
        PreprocessImage();             // Normalize, resize, etc.
        interpreter->Invoke();         // Run inference
        ProcessResults();              // Action based on output
        vTaskDelay(pdMS_TO_TICKS(50)); // Run every 50ms
    }
}

int main() {
    xTaskCreate(ai_task, "AI_Task", 2048, NULL, 2, NULL);
    vTaskStartScheduler();
    while (1); // Should never reach
}
Conclusion
Modern embedded systems are evolving rapidly, driven by the demands of real-time AI, AR/VR, and connected intelligence. To meet these challenges, developers must balance low-level performance with high-level modularity by selecting the right combination of Assembly, C, and C++ — along with a capable RTOS tailored for modern AI,AR/VR workloads. Whether you’re building a smart sensor node, a robotic controller, or a wearable vision device, understanding how to map language features and RTOS capabilities to your hardware accelerators and application logic is key. By leveraging the right tools and architecture from the start, you can create systems that are not only efficient and scalable but also ready for the future of embedded intelligence.
Augmented Reality (AR), Virtual Reality (VR), and Extended Reality (XR) are rapidly evolving technologies that are reshaping digital experiences across industries. This article explores the technical challenges associated with these technologies, including hardware limitations, latency issues, and the need for high computational power. It compares AR, VR, and XR in terms of functionality, applications, and user experience, highlighting their unique strengths and overlaps. Additionally, the article identifies key market leaders driving innovation in this field. Furthermore, it examines the relationship between AR, VR, and XR with cloud computing and artificial intelligence (AI), emphasizing how these technologies enhance real-time rendering, data processing, and immersive interactions. As AR, VR, and XR continue to advance, their integration with AI and cloud computing will be crucial in unlocking new possibilities for immersive digital environments.
Summary
The growing popularity and attractiveness of VR, AR, and XR can be attributed to several key factors, including technological advancements, increasing accessibility, and expanding use cases across various industries. One of the biggest reasons these technologies have gained momentum is the rapid advancement in hardware and software. Modern VR headsets, such as the Meta Quest series and PlayStation VR, are now more powerful, affordable, and wireless, making them easier for consumers to adopt. Similarly, AR glasses and smartphone-based AR applications have become more refined, offering higher-quality visuals and better real-world integration. The rise of AI and 5G connectivity has also improved real-time processing, making AR and XR experiences more seamless and responsive.
Another driving force is the diversification of applications beyond gaming and entertainment. Initially, VR was mainly associated with gaming, but today it is widely used in training, education, healthcare, and business. Companies use VR for employee training and virtual collaboration, while AR is revolutionizing fields like retail, marketing, and industrial design by allowing users to visualize products and interact with digital models in their real environment. Additionally, XR is playing a major role in the metaverse, where virtual spaces are being developed for social interactions, business meetings, and even digital real estate. AR has enhanced e-commerce, allowing customers to “try before they buy” using virtual previews. As more companies invest in these technologies, their adoption continues to grow across multiple sectors.
Lastly, big tech companies and investors are fueling the momentum by heavily investing in XR technologies. Apple’s Vision Pro, Meta’s Metaverse push, and Microsoft’s HoloLens are all driving innovation and making immersive experiences more mainstream. With continuous improvements in hardware, software, and real-world applications, VR, AR, and XR are becoming not just futuristic concepts, but essential tools shaping how we work, play, and interact with digital content.
What are all of those and their difference ?
Virtual Reality (VR) is a technology that creates a fully immersive digital environment, completely replacing the real world. Users wear VR headsets, such as the Meta Quest or HTC Vive, which block out their surroundings and transport them into a computer-generated world. This technology is commonly used in gaming, virtual tours, and training simulations, allowing users to interact with digital environments through motion tracking, hand controllers, and haptic feedback. The key characteristic of VR is that it fully immerses the user in a separate, artificial reality.
Augmented Reality (AR), on the other hand, enhances the real world by overlaying digital content onto it. Unlike VR, AR does not replace reality but instead adds virtual elements to it using smartphones, tablets, or AR glasses. Popular applications of AR include mobile games like Pokémon GO, social media filters, and retail experiences that allow users to visualize products in their environment before making a purchase. The defining feature of AR is its ability to blend digital and real-world elements in real-time.
Extended Reality (XR) is an umbrella term that encompasses both VR and AR, as well as Mixed Reality (MR), which integrates digital and physical elements more seamlessly. XR is used to describe any immersive technology that extends or modifies reality, whether by fully immersing users in a virtual space or enhancing their real-world surroundings with digital content. Companies developing next-generation immersive experiences, such as Apple, Meta, and Microsoft, often refer to their innovations as XR, emphasizing the convergence of VR and AR into a unified technological field.
Main Differences Summary
Feature
VR (Virtual Reality)
AR (Augmented Reality)
XR (Extended Reality)
Immersion
Fully immersive, replaces reality
Enhances reality, digital objects overlay
Includes both VR & AR
Device
VR headsets (Meta Quest, HTC Vive)
Smartphones, AR glasses (HoloLens, Vision Pro)
Covers all XR headsets
Example
Gaming, training, simulations
Pokémon GO, AR filters, shopping apps
Future tech that merges VR & AR
Technology challenges
Each of these technologies—VR, AR, and XR—faces unique technical challenges that impact their development, adoption, and long-term success. Some challenges are more difficult to overcome than others, depending on the complexity of the technology and its interaction with the real world.
Challenges of Virtual Reality (VR)
VR’s biggest challenge is hardware limitations. Achieving high-resolution, ultra-smooth graphics while maintaining low latency (to prevent motion sickness) requires powerful processors and GPUs, which can be expensive and power-hungry. Additionally, ergonomics and comfort remain a problem—headsets can be bulky, heavy, and uncomfortable for long-term use. Another issue is motion sickness, caused by discrepancies between visual movement and the body’s physical sensations. VR also struggles with real-world interaction—users are fully immersed but cannot easily interact with their actual surroundings. While VR has made great strides, improving realism while keeping costs low remains a challenge.
Challenges of Augmented Reality (AR)
AR faces even more technical hurdles than VR because it must seamlessly blend digital objects with the real world in real time. The most significant challenge is accurate spatial mapping and object occlusion—AR systems must recognize and interact with real-world surfaces, lighting, and depth without lag. Current AR experiences on smartphones and glasses still struggle with real-time processing and alignment, especially in dynamic environments. Battery life is another major limitation, as AR glasses require constant processing of both the digital overlay and the real-world video feed. Furthermore, field of view (FoV) is a problem for AR glasses—most AR displays only show a limited portion of augmented content, making the experience less immersive than intended.
Challenges of Extended Reality (XR)
Since XR is an umbrella term covering both VR and AR, it inherits all the challenges of each technology while also adding another layer of difficulty: seamless integration between virtual and real environments. The biggest issue is hardware miniaturization—creating lightweight, comfortable devices that can handle both VR’s full immersion and AR’s real-world overlay in a single headset is extremely difficult. Additionally, XR must handle advanced AI-driven interactions, eye tracking, and haptic feedback, which require complex algorithms and high processing power. Interoperability is another challenge—XR must work across different platforms, devices, and software ecosystems, making standardization difficult.
Relationship to AI technologies
AI plays a crucial role in advancing VR, AR, and XR, helping to solve many of their biggest challenges. These technologies require real-time processing, intelligent interactions, and adaptive systems, all of which AI enhances. Below are the key areas where AI is making an impact:
AI in Virtual Reality (VR)
Realistic Simulations & NPCs – AI enhances VR by generating intelligent, responsive virtual characters (NPCs) in games and simulations. Instead of pre-programmed responses, AI-driven NPCs can adapt and react based on user behavior.
Motion Prediction & Latency Reduction – AI helps predict user movements to reduce motion sickness by compensating for processing delays and making VR experiences feel more natural.
Procedural Content Generation – AI can create dynamic VR worlds, generating landscapes, environments, and objects in real-time based on user interactions, making virtual experiences more immersive.
Eye & Hand Tracking Enhancement – AI-powered eye tracking helps improve rendering efficiency by focusing graphics processing power on areas where users are looking, reducing overall processing demands (a technique known as foveated rendering).
AI in Augmented Reality (AR)
Object & Environment Recognition – AI enables AR to understand the real world by recognizing objects, people, and environments. This allows AR apps to place virtual objects more accurately in a real-world setting.
Spatial Mapping & Occlusion – AI-powered computer vision helps AR systems map surfaces, recognize walls, floors, and objects, and determine how digital elements should interact with them. This prevents virtual objects from “floating” unnaturally in AR experiences.
Real-Time Translation & AI Assistants – AI-driven AR applications can provide real-time language translation by recognizing text or speech in different languages and overlaying translations in the user’s view. AI assistants (like Apple’s Siri or Google Assistant) can also integrate with AR to provide contextual information about objects seen through an AR lens.
Gesture & Voice Recognition – AI allows AR devices to recognize hand gestures and voice commands, enabling more natural interaction with digital objects without relying on controllers or touchscreens.
AI in Extended Reality (XR)
Adaptive & Personalized Experiences – AI can analyze user preferences and behavior in XR environments, allowing applications to dynamically adjust and provide more personalized interactions.
AI-Powered Avatars – In XR social spaces (such as the metaverse), AI creates lifelike avatars that can mimic real human expressions, speech patterns, and emotions using machine learning and facial tracking.
Haptic Feedback & AI-Powered Touch Simulation – AI is improving haptic technology, making virtual objects in XR feel realistic through touch by dynamically adjusting vibrations and pressure feedback based on user interactions.
AI-Based Natural Language Processing (NLP) – XR environments integrate AI chatbots and virtual assistants that understand human speech, enabling natural voice conversations between users and AI-driven digital assistants.
Which AI Technologies Are Involved?
Computer Vision (used in AR for object recognition and spatial mapping)
Machine Learning & Deep Learning (used in VR for NPC behavior and AI-driven interactions)
Natural Language Processing (NLP) (used in XR for voice assistants and real-time translation)
Reinforcement Learning (used in VR for improving AI character learning and interactions)
Generative AI (used for creating dynamic VR worlds, avatars, and environments)
Current Technical Leaders
Several leading companies and products are driving the development of VR, AR, and XR. Each field has major players investing heavily in innovation, creating cutting-edge hardware and software solutions. Here’s a breakdown of the key players and their leading products:
Fully Immersive Digital Worlds
1. Meta (formerly Facebook) – Meta Quest Series
Product: Meta Quest 3, Meta Quest Pro
Why it’s Leading: Meta’s Quest series is the most popular standalone VR headset, requiring no external PC or console. The Quest 3 introduced mixed reality (MR) features and advanced hand tracking.
Use Cases: Gaming, fitness, social VR (Horizon Worlds), enterprise training.
2. Sony – PlayStation VR2 (PSVR2)
Product: PlayStation VR2
Why it’s Leading: Designed for PS5 gamers, it offers 4K HDR visuals, eye tracking, and haptic feedback for a premium experience.
Use Cases: VR gaming (Resident Evil Village, Gran Turismo 7).
3. Valve – Valve Index
Product: Valve Index
Why it’s Leading: Considered the highest-quality PC VR headset, with finger-tracking controllers and ultra-high refresh rates.
Use Cases: High-end VR gaming (Half-Life: Alyx).
4. HTC – Vive XR Elite, Vive Pro 2
Why it’s Leading: HTC specializes in high-end VR for both consumers and businesses with modular upgrades and enterprise-focused solutions.
Use Cases: Gaming, professional training, medical simulations.
Augmented Reality (AR) – Overlaying Digital Content on the Real World
1. Apple – Apple Vision Pro (AR + MR)
Why it’s Leading: Apple’s first spatial computing headset combines high-resolution AR and MR with a powerful M2 & R1 chip, eye tracking, and hand gestures.
Use Cases: Productivity, entertainment, spatial computing, immersive apps.
2. Microsoft – HoloLens 2
Why it’s Leading: A business-focused AR headset used in enterprise, healthcare, and manufacturing, offering holographic displays and real-world interaction.
Use Cases: Remote collaboration, medical training, industrial work.
3. Magic Leap – Magic Leap 2
Why it’s Leading: Specializes in industrial and medical AR, with a focus on lightweight AR optics and eye-tracking.
Use Cases: Healthcare visualization, enterprise applications.
4. Niantic – AR Games & Software (Pokémon GO, Lightship SDK)
Why it’s Leading: Niantic is the leader in mobile AR, making Pokémon GO the most successful AR game. Their Lightship AR SDK powers real-time AR mapping for developers.
Use Cases: Gaming, AR navigation, social AR experiences.
Extended Reality (XR) – The Future of Mixed VR + AR Experiences
1. Meta – Meta Quest Pro
Why it’s Leading: One of the first mainstream mixed reality (MR) devices, blending VR and AR in one headset.
Use Cases: Productivity, enterprise, collaboration, 3D design.
2. Apple – Vision Pro (AR + MR)
Why it’s Leading: Combines high-fidelity AR with VR capabilities, making it a true XR headset with Apple’s ecosystem support.
Use Cases: Spatial computing, creative applications, entertainment.
3. Microsoft – HoloLens XR for Industry
Why it’s Leading: Microsoft is focused on XR for businesses, integrating HoloLens with AI, cloud computing, and industrial applications.
Use Cases: Remote assistance, factory training, medical applications.
4. Qualcomm – Snapdragon XR Chips
Why it’s Leading:Provides AI-powered XR chips for AR/VR headsets from various manufacturers, helping power XR devices.
Use Cases: XR hardware development (used in Meta Quest, Lenovo, and HTC devices).
Here’s a summarized table of the leading companies, products, and their key highlights in VR, AR, and XR fields:
Technology
Company
Product
Key Highlights
Main Use Cases
VR (Virtual Reality)
Meta
Meta Quest 3, Quest Pro
Standalone VR, high-resolution passthrough for mixed reality
Gaming, fitness, social VR, enterprise training
Sony
PlayStation VR2 (PSVR2)
High-end VR for PS5, 4K HDR, eye tracking, haptics
Gaming (Resident Evil Village, Gran Turismo 7)
Valve
Valve Index
Best PC VR experience, high refresh rate, finger tracking
High-end gaming (Half-Life: Alyx)
HTC
Vive XR Elite, Vive Pro 2
High-quality modular VR for consumers and businesses
Enterprise AR, real-world interaction with holographic overlays
Remote collaboration, healthcare, industrial work
Magic Leap
Magic Leap 2
Lightweight AR headset with advanced optics
Healthcare, enterprise applications
Niantic
Lightship AR SDK, Pokémon GO
Leading mobile AR platform, real-time AR mapping
AR gaming, navigation, social AR
XR (Extended Reality – Mixed VR & AR)
Meta
Meta Quest Pro
Mixed reality with hand tracking & passthrough AR
Productivity, enterprise, 3D design
Apple
Vision Pro
High-fidelity AR & VR in one device, Apple ecosystem
Spatial computing, creative applications, entertainment
Microsoft
HoloLens XR
AI-powered XR for industrial applications
Remote assistance, factory training, medical applications
Qualcomm
Snapdragon XR Chips
AI-powered XR processing chips
Powering XR devices (used by Meta, Lenovo, HTC)
Market value and future of those technologies
The Extended Reality (XR) market, encompassing Virtual Reality (VR), Augmented Reality (AR), and Mixed Reality (MR), is experiencing significant growth and is poised for substantial expansion in the coming years.
The market is projected to reach $1,706.96 billion by 2032, with a Compound Annual Growth Rate (CAGR) of 32.9% from 2024 to 2030. grandviewresearch.com
Key Growth Drivers:
Technological Advancements: Improvements in XR hardware and software, including more affordable devices and the integration of artificial intelligence (AI), are enhancing user experiences and accessibility. reuters.com
Industry Adoption: Sectors such as gaming, entertainment, healthcare, education, and retail are increasingly incorporating XR technologies to provide immersive experiences and innovative solutions.
Consumer Demand: There is a growing appetite for interactive and immersive content, particularly in gaming and entertainment, driving the adoption of XR applications.
Future Outlook:
Device Shipments: Global shipments of AR and VR headsets are expected to grow by 41.4% in 2025, expanding to 22.9 million units by 2028 from an estimated 6.7 million units in 2024. reuters.com
AI Integration: The incorporation of AI is anticipated to enhance XR applications, offering more personalized and adaptive user experiences.
Market Expansion: With continuous technological innovations and increasing applications across various industries, the XR market is set to become a significant component of the global digital economy.
In summary, the XR market is on a robust growth trajectory, driven by technological advancements, diverse industry applications, and rising consumer interest in immersive experiences.
Relationship Between XR (VR, AR, MR) and Cloud Computing
Cloud computing plays a critical role in the evolution of Virtual Reality (VR), Augmented Reality (AR), and Mixed Reality (MR) by enhancing performance, scalability, and accessibility. Here’s how they are connected:
Cloud Rendering & Streaming for XR
XR applications require high computational power for real-time rendering. Cloud computing offloads processing to remote servers, allowing lightweight headsets and mobile devices to access high-quality experiences.
Example:NVIDIA CloudXR streams high-end VR/AR content from the cloud to devices with minimal latency.
Benefit:High-fidelity XR experiences without expensive local hardware.
Edge Computing for Low Latency XR
XR requires ultra-low latency to ensure smooth interaction and reduce motion sickness. Edge computing (processing data closer to the user) reduces delay by placing cloud servers closer to XR users.
Example:5G + Edge Computing is used for AR applications like Google ARCore and Apple ARKit, allowing real-time AR overlays on mobile devices.
Benefit:Faster response times for real-time XR applications.
AI & Cloud-Powered XR Experiences
AI models for computer vision, speech recognition, and object tracking require huge datasets. Cloud AI services train and process these models remotely, making XR experiences more intelligent.
Example:Google Cloud AI enables AR apps to recognize objects and environments dynamically.
Benefit:More intelligent and context-aware XR applications.
XR Collaboration & Remote Work via Cloud
Cloud-based XR allows multiple users to interact in the same virtual or augmented environment, even from different locations.
Example:Microsoft Mesh (powered by Azure Cloud) enables holographic meetings and virtual collaboration across devices.
Benefit:Remote teamwork, training, and virtual meetings in XR spaces.
Cloud Storage & Data Synchronization for XR Content
XR applications generate and use large amounts of data, including 3D models, maps, and user interactions. Cloud storage enables real-time data synchronization across devices.
Example:Meta’s VR cloud services store user profiles, VR game progress, and social interactions.
Benefit:Seamless XR experiences across multiple devices and locations.
Cloud computing enables scalable, real-time, and intelligent XR experiences by handling processing, AI, and data synchronization. Future 5G and AI-powered cloud computing will further revolutionize VR, AR, and XR, making them faster, cheaper, and more accessible.
Difference Between Optical See-Through and Camera See-Through in VR/MR Products
In Mixed Reality (MR) and Augmented Reality (AR) headsets, there are two main ways to blend virtual elements with the real world:
Optical See-Through (OST)
Uses Transparent Lenses to Overlay Digital Content on the Real World
How It Works:
The headset has transparent lenses or waveguides, allowing the user to see the real world directly with their own eyes.
Virtual objects are projected onto the lenses using holographic displays or micro-projectors.
Examples of OST Headsets:
Microsoft HoloLens 2
Magic Leap 2
Google Glass Enterprise Edition
Pros: Real-world visuals remain natural and lag-free. More comfortable for long-term use (no eye strain from digital screens). Can be used outdoors since real-world brightness is not limited by cameras.
Cons: Virtual objects often appear semi-transparent, making them less immersive. Limited field of view (FOV) compared to fully immersive experiences. Poor low-light performance, since the display relies on real-world brightness.
Camera See-Through (CST) / Video See-Through (VST)
Uses Cameras to Capture the Real World and Displays It on a Digital Screen
How It Works:
The headset blocks the user’s direct vision and instead uses external cameras to capture the real-world view.
The real-world video feed is combined with virtual elements and displayed on internal screens (LCD, OLED, or microLED) inside the headset.
Examples of CST Headsets:
Apple Vision Pro
Meta Quest 3 & Meta Quest Pro
Varjo XR-4
Pros: Virtual objects appear fully opaque and more realistic. Wider field of view compared to optical see-through. Works in any lighting condition, even in the dark.
Cons: Latency issues – Even slight delays between the real world and the display can cause motion sickness. Lower image clarity – Cameras and displays can distort real-world visuals or have lower resolution than direct vision. Requires powerful processing, increasing battery consumption.
Which One is Better?
Optical See-Through (OST) is better for enterprise AR applications, like medical training, manufacturing, and fieldwork, where real-world clarity is crucial.
Camera See-Through (CST) is better for immersive mixed reality (MR) applications, like VR gaming, virtual desktops, and creative work, because it blends digital and real-world objects more seamlessly.
Future XR devices will likely combine both techniques. Some headsets, like Meta Quest Pro and Apple Vision Pro, use high-resolution camera see-through but are working toward reducing latency and distortion, making them more natural. Meanwhile, optical see-through headsets like HoloLens may improve field of view and brightness control to enhance immersion.
OpenXR: The Standard for Cross-Platform XR Development
OpenXR is an open standard developed by Khronos Group to provide a unified API for VR, AR, and XR devices. It allows developers to create applications that work across multiple XR hardware platforms without needing separate integrations for each device.
Why OpenXR Matters?
Before OpenXR, VR and AR devices had their own software development kits (SDKs), making it difficult for developers to support multiple platforms. OpenXR solves this fragmentation by providing a common API, enabling apps and engines to run on different headsets without modification.
Cross-Platform Compatibility → One codebase for multiple devices Simplifies Development → Reduces effort in writing hardware-specific code Future-Proofing → Ensures applications can adapt to new XR hardware
Industry Adoption of OpenXR
Major XR companies have embraced OpenXR as the standard for future development:
VR Industry Adoption
Meta (Quest 2, Quest 3, Quest Pro) → OpenXR is the default API for Quest headsets. Valve (SteamVR, Index) → SteamVR supports OpenXR, making it easier for developers to publish games across platforms. Microsoft (Windows Mixed Reality, HoloLens 2) → OpenXR is now the official standard for Windows XR devices. HTC (Vive Series) → Vive Cosmos and Vive Pro support OpenXR.
AR/MR Industry Adoption
Microsoft (HoloLens 2) → Switched to OpenXR for long-term AR/MR support. Qualcomm (Snapdragon XR2 chips) → OpenXR powers the XR ecosystem for many AR/VR devices. Magic Leap → Uses OpenXR to provide compatibility with more software.
Game Engines & Software
Unity & Unreal Engine → Both major XR development engines have native OpenXR support, allowing games and apps to run seamlessly across different headsets. NVIDIA & AMD → Provide OpenXR-compatible drivers for XR applications.
Future of OpenXR
More Devices Will Adopt OpenXR → With Apple entering the XR market with Vision Pro (currently using a proprietary visionOS SDK), there is speculation that Apple might adopt OpenXR in the future to increase compatibility.
Cloud & Streaming XR → OpenXR will help power cloud-rendered XR experiences across devices, allowing lightweight headsets to run high-end applications.
More XR Content & Applications → As more developers use OpenXR, the XR ecosystem will grow faster, reducing fragmentation in the industry.
OpenXR is already the dominant standard for VR, AR, and XR applications, with broad industry adoption. As more hardware makers and software developers transition to OpenXR, it will drive greater interoperability, faster development, and more innovative XR applications.
We all know CI/CD (Continuous Development/Continuous Integration) is the modern way in the current software development process. In this article, a real working example using this technology is illustrated using one of my real, daily, firmware feature development examples, which I believe will make this abstract concept more tangible and understandable if you never have a chance to use it in your professional career. Let’s begin:
Step 1: Develop your firmware feature, of course. Let’s assume you are coding a firmware to use a drive to toggle the GPIO, then light up an LED device attached to it. The driver itself is not written by you and you just use it for above very simple business logic. An C/C++ module with header and source code is written, compiled error free and has been tested with real hardware or simulator to prove it is working. This version of the code just has basic features and you will add more and more features into it and the goal is to fit it into the CI/CD pipeline, so it can be constantly developed and verified. Now, we need to go to the next step.
Step2: We need to add unit tests to step1’s code to make sure of two things: First, with any modification of the code, the correct LED/GPIO driver interface is called with expected result. A return code of zero, or SUCCESS is a good signal of pass. If you got the correct return code and your LED does not behave like you expected, it is a bug in the driver code, not in your code. Created a bug report and filed to the driver team is all you need to do. Also, in this step, all your business logic needs to be verified. For example, you take an input as a parameter, do some AND, OR logic, feed with some constant mask and so on. All those need to be verified even without hardware. Then, the question is how ? This will be realized by the second procedure in this Step. Secondly, using unit test framework like gtest (Google Test Framework), create a suite of data driven test cases to test your business logic. One example can be : provide an input value to a function and verify the output of the function’s internal logic works fine. If the business logic is to OR the last bit of the input parameter with one and then output the new value to the driver, your test case should make sure the last bit of output is one instead of zero after your API call. Without required hardware, which the driver you depend on needs to be working, you can use a method called Mock method to fake the behavior of under line drive and focus on your business logic only. By the way, gtest is most suitable for C++ based code testing. If your code is pure C code, gtest can still be used while the FFF framework is the best choice for C code. Then, we will go to next step:
Step 3: With the working testing framework developed in the above step, you can use integration test framework, like Catch2, Robot Framework, Test Cafe and whatever you prefer. Your test script will compile your step 1’s code, run your step2’s test cases, reserve testing devices for you if necessary and then report the testing result in a nice graphic way including information like code coverage percentage. When a test error happens, notification like email can be sent out automatically with detailed steps to repeat the failure , software check in signature, software version control snapshot and so on, which provide a starting point for you to repeat and fix the issue.
Step 4: Now, with all above success, you need to add this test suite into the End to End testing framework to let the framework trigger an automatic testing flow of your code when there is a new check in happening in your source code version control, auto run the test hourly, daily and so on. There are a lot of such end to end testing frameworks such as Jenkins which usually can take JSON, Python script as configuration source. It can provide the user with nice dashboard, notification mechanism, code coverage information, failure filtering, triggering rules to name a few.
In summary, CI/CD is alway the way I prefer in modern software, firmware development environments. It becomes nature after you adopt it and can make your daily professional software development life easier and more productive.
There are multiple ways to secure your deployed Kubernetes cluster. In this article, the five, most effective steps and ways to achieve your security goals, then protect your cluster from hiking are summarized.
Secure cluster access through firewall
Control the Kubernetes cluster master management node access through reverse proxy with IPSec encrypted communication between the proxy and the master node.
Using two way authentication with SSO to secure the proxy server access from external users using SSH like secure channels.
Deploy AAA policies for API access
Use Authentication, Authorization and Admission control to fine turn the availability of Kubernetes resources to different users and Pods. X.509 client certificate, OIDC, web hook with static token issued by Kubernetes API servers with the help of technologies such as Active Directory server, secure LDAP can make the process more scale. RBAC, ABAC, Node Authorization with OPA are the practical way to achieve cluster Authorization. Using PSA policy to achieve Pod admission to prevent pods to gain unnecessary access privilege such as root access permission.
Secure key components of cluster
Using a distributed ETCD server with encrypted database, using mTLS between the communication between ETCD and API servers, route the certificate and keys more frequently.
Control Application Pod’s Access Capacity
Using Pod security policy with OPA to further control what application pods deployed into the cluster can and can not do to the system.
Secure the cluster network traffic
Use CNI implementation such as Calico with supported network policies. Always encrypted network traffic between nodes, system pod to pod network communication.
Secure application pods with service mesh
When the number of application pods deployed into the cluster exceeds a certain number, it is worth deploying service mesh solution to the cluster to gain secure network traffic between pods with mTLS, application pod trace ability, monitoring benefits and so on.
Suitable security policies are one of the key components to make your Kubernetes cluster dynamic, secure, manageable and robust.
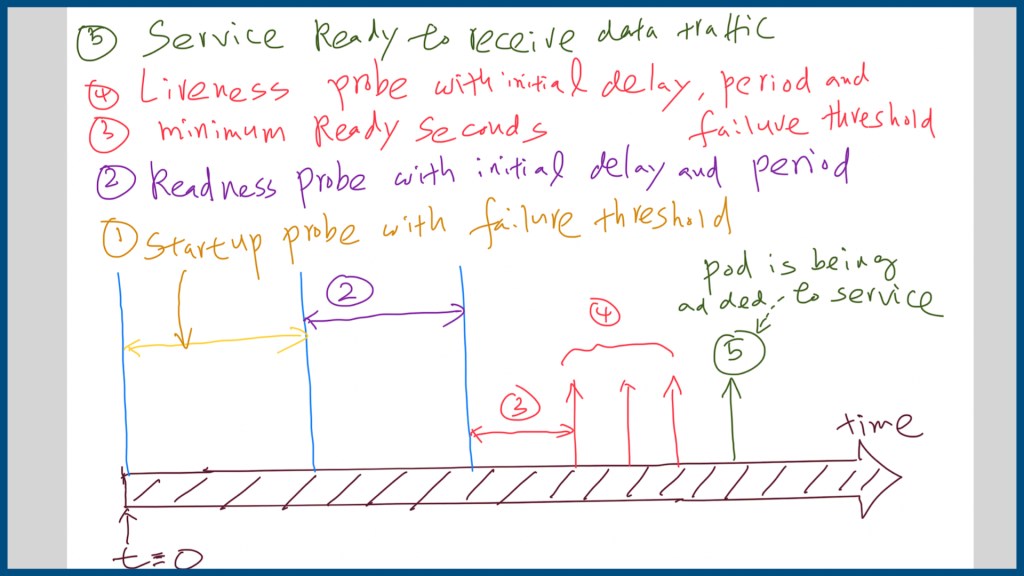
When you put your application into Kubernetes pod and orchestrated by Kubernetes, the orchestrator provides multiple mechanisms to decide when the pod can be treated as fully out of rebooting process, the pod is functional and ready to be put into the service to accept live, application network traffic. All those are achieved by a couple of pod rebooting time control parameters, i.e. liveness and readiness probe mechanism.
The timeframe of pod boot up and come to live can be illustrated by following diagram:
It can be divided into 5 phases and can be controlled by those parameters and probing mechanism in the pod’s yaml configuration file:
Startup Probe with Failure Threshold: a probe to determine whether or not an application has finished its starting up procedure. The following probes will wait for this start up probe to succeed before beginning the liveness checks.
Readiness Probe with initial delay and configurable probing period: A pod needs to pass this probe before being added to the services that match the elective label of pods by Kubernetes. Another interesting fact is that Kubernetes does not restart a pod which failed with a Readiness probe.
Delay for pod to be thought as ready: Provide a way to give the pod more time to be kicked into the liveness probe stage.
Pod liveness probe with initial probe delay and configurable probe period: this is the health check to determine whether the container is working or not. It is a common practice to create a /healthz endpoint for this purpose. The periodSeconds and failureThreshold parameters control how frequent the healthy check should be and after what threshold, the check is treated as failure and then triggers the restart of the pod.
Last stage: The pod is treated as ready to be put into the according service’s pod list to receive live, application traffic.
Examples of those configuration can be illustrated by following Pod configuration yaml file:
Provide startProbe mechanism to let other applications to query the starting status of the containerized application with snippet of manifest file as following:
All those mechanisms help Kubernetes to detect a common scenario of the container in order to restart it: the process of containerized application is still running from the operating system’s point of view, but is in a stuck state and can not serve any user request.
Written by: Keyuan Zhang and thanks for the reading.
With the proliferation of cloud computing environments, new software development and deployment methods are developing rapidly. In the development side, CI/CD, DevOps, SecOps and so on, make the software development, deployment cycle fully automatic: From planning, coding, building, testing to deployment using IaC ( Infrastructure as Code), SaaS(Software as a Service) for containerized cloud functions’ operation, monitoring, auto scaling, auto recovering under Kubernetes orchestrator.
As SaaS are containerized applications deployed to cloud with Kubernetes as orchestrator, together with other cloud technologies such as ingress, load balancer, service mesh, those introduce new software release upgrade and update methods: Rolling update, Recreate upgrade, Blue/Green deployment, Rainbow deployment, A/B testing, to name a few.
In this article, all those technologies will be briefly reviewed and focus on when and which mechanism to use in order to achieve zero-downtime software release goal with consideration of deployment cost, scenarios and required support technologies.
Build High Quality Application Container Image
Use ways such as build-in unit testing and multi stage build docker file to make sure the created application docker image is unit tested with least possible size. Use tools such as Skaffold, Telepresence to locally deploy, test your new application container image.
Use Rolling Update for Release Update
Kubernetes has built-in support for rolling update when you use commands: kubectl apply or Helm upgrade with new version of container image. This is normally used when bugs are found and fixed within a minor release after the major release was deployed. maxSurge and maxUnavailable parameters can be used to control the portion of new and old application images running within the cloud cluster. You only need one cloud cluster to carry out rolling updates. If you do not need this kind of gradually updating way and want to update all container images to the new version quicker, the Recreate update mechanism can be used instead.
Utilize Blue/Green/Rainbow Update
If you can afford multiple clusters’ cost, the blue/green update method can be used, which means you have a new release running on the side of the old release on different cluster. Then the application users’ traffic can be directed to either of the clusters with cloud technologies such as pod labeling, ingress or traffic manager. The application traffic can be easily switched back and forth between new or old software releases. If there are more than two versions of applications that need to be tested simultaneously, rainbow update can be used with multiple clusters being used.
Canary Release
If the cost of maintaining multiple clusters used in the blue, green deployment mechanism is too expensive and unrealistic, Canary release can be used with the help of service mesh to route a small portion of traffic to new version of software release and keep most of application routed to tested, older release. If the new software release worked as expected, 100% of application traffic can be routed to new software release. On the other hand, if the test is failed, the small portion of traffic routed to new release can be re-routed back.
After this kind of canary testing, 100% of application traffic can be switched to the new release and being switched back to the previous release on the fly. This kind of release is so called A/B release.
Service meshes, like Istio, Linkerd, Nginx should be used for best result for such kind of deployment, although pod labels can also be used to achieve similar results.